Contents
What are adjustment layers? How do they work?
Photoshop is a pixel manipulation program. You are actually changing the pixels. To return to the original image, you’d better make a copy of it for safe-keeping. Once you save an image you’ve worked on in Photoshop, or if you run out of undo commands, you’re out of luck unless you have a backup. That is, until adjustment and fill layers were added to Photoshop.
As Photoshop evolved, Adobe developed non-destructive ways to edit your images so that the original would be unaffected. That way you could return to the original image at any time. Any modifications are saved as a list of instructions saved within the file, leaving the original file intact. You can also return at any time and re-adjust the image settings.
Adjustment layers are one of these non-destructive editing methods. You can go back and re-adjust the settings at any time. Adjustments are saved as a list of instructions in your Photoshop file – taking up a very minimal amount of space in the file. They also come with the benefit of a mask, so you can adjust only the portions of the image you wish to work with. Watch the video:
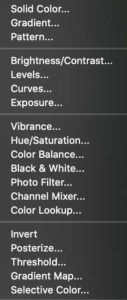
Adjustment layers provide you with powerful, non-destructive image manipulation tools. Most of them deal with color or luminance. Once you understand what they do, and how to use them, they will become an indispensable part of your Photoshop toolbox.
Adjustment layers provide the following advantages:
- Nondestructive edits. You can try different settings and re‑edit the adjustment layer at any time. You can also reduce the effect of the adjustment by lowering the opacity of the layer.
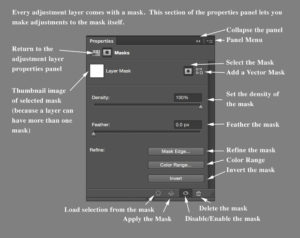
- Selective editing. Paint on the adjustment layer’s image mask to apply an adjustment to part of an image. Later you can control which parts of the image are adjusted by re-editing the layer mask. You can vary the adjustment by painting on the mask with different tones of gray.
- Ability to apply adjustments to multiple images. Copy and paste adjustment layers between images to apply the same color and tonal adjustments. (Source)
How are adjustment layers different than Photoshop’s adjustments menu?

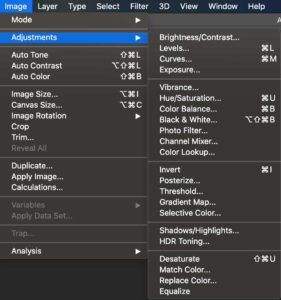
Once upon a time, Photoshop didn’t have adjustment layers. The only adjustments were available in the Image > Adjustments menu. The main difference between these older adjustments and the newer adjustment layers is that these older adjustments are destructive – that is, they actually change the pixels in your image. The only ways you can reverse these is through the undo command, or the history panel, or to make your layer a smart object before applying any of these.
You’ll notice that there are some adjustments in this menu that don’t have an equivalent adjustment layer. Shadows/Highlights will be one we’ll cover later on in this lesson. There are times when you’ll want to use these adjustments. For example, when you want to match the color of one layer to the colors in another.
Adjustment layers can be readjusted at any time, take very little additional space in your file, come with a mask so you can limit the adjustment to any portion of the image, and can affect only one layer you’ve clipped it to or all layers beneath it. I strongly recommend using adjustment and fill layers whenever that option is available to you. I think eventually, Adobe will make everything in this menu available as non-destructive adjustments.
The anatomy of an adjustment layer
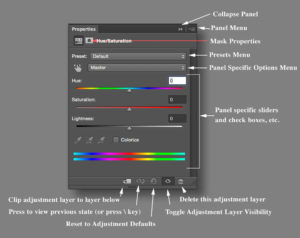
Let’s take a moment and have a look at the layer adjustments, so we understand the options available…


